Deploy Python Lambda Function With A Docker Container
Published:
Deploying Python Lambda Function with a Docker Container
Have you ever deployed an application on the cloud ? or just in a simple an EC2 server. You have to look into a lot of configs, and management such as scaling, resources to be used, cost optimization if ports are to be opened, or triggering the application from another service. Or, if you use docker and EKS to deploy it’s another nightmare to configure the Kubernetes, configurations, and access management.
Recently AWS has launched a service where we can deploy any Docker container on AWS lambda. You can find more details on what is lambda here. Basically, in simple terms, Lambda is a Serverless compute engine where you just deploy your application and all the resources are managed by AWS. Also, the lambda function won’t be running 24*7 which means, the cost will only occur if the lambda function is invoked, if not, there would be no cost.
Now, Let’s get to the implementation,
To follow along with this, you only need :
- Python app
- A Container Lambda function
- ECR ( Elastic Container registry )
Lets clone this repository. This is a simple Python app that just returns, “hello world”.
Here we have two files, the first one is application.py which contains one simple function that simply returns the 200 success responses.
def handler(event, context):
    return {
        "statusCode": 200,
        "body": "Hello there"
    }
It takes two arguments:
An event object: a JSON-formatted document, which is usually a Python dict type. But it can also be None or something else. It is passed while invoking the lambda function. We will see how it would be used.
A context object: This object provides information about the invocation, function, and runtime environment.
Since, event object is a JSON formatted document, for example:
"userID": "1234",
"Token": "kdjfnjdsf"
We can extract the values from them and use them in our codebase, let us do that, and change our function application.py
def handler(event, context):
    userID = event["userID"]
    Token = event["Token"]

    # Any logic that your app should perform.

    return {
        "statusCode": 200,
        "body": "Hello there",
        "userID" : userID,
        "Token": Token
    }
Now, let us create a Dockerfile. First, we simply pull the python image from the public ecr repo. Then, we just copy the application.py, then simply run the python app. Make sure, the name is application.handler i.e. the function handler from application.py is the entry point for our application that would be deployed in lambda.
FROM public.ecr.aws/lambda/python:3.8

COPY application.py ./
CMD ["application.handler"]
In more complex applications you would typically install the requirements and dependencies, and so on. The normal dockerfile you are used to building.
Push Image to ECR
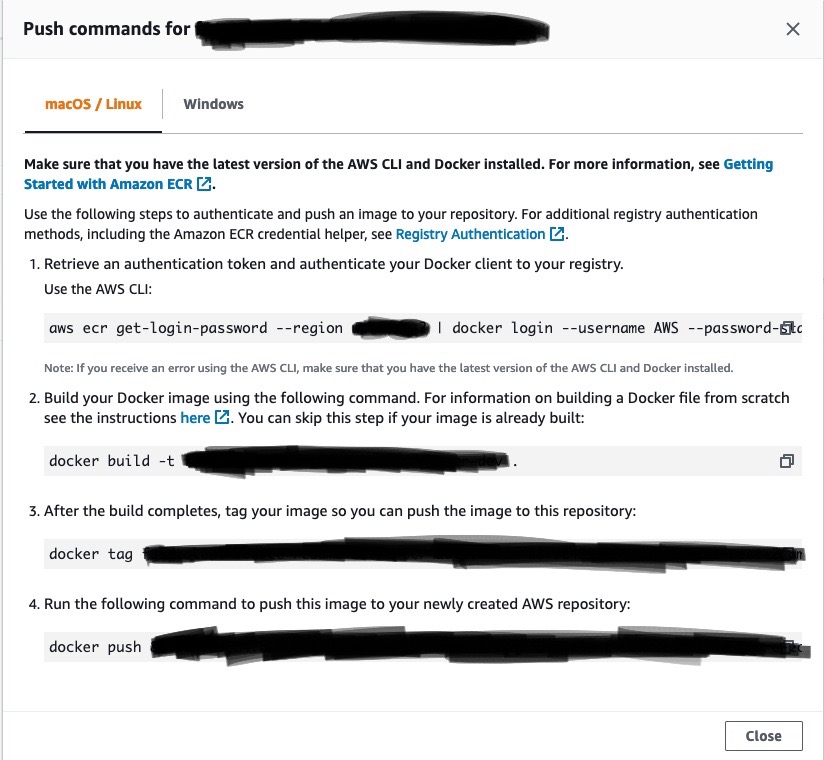
Now, the only remaining step is to build the docker images and push them to our ECR repo that we have created.

Steps:
- Go into the ECR that you have created.
- Click
view push commands Just copy and paste those commands.
- The first command is used to validate the aws credentials. If it is not set on your machines, you need to set the credentials using
aws configureii ) - The second command is to build the image.
- The third command is to tag the docker image.
- The fourth command is to push the image to ECR.
- The first command is used to validate the aws credentials. If it is not set on your machines, you need to set the credentials using
Deploy the Image and Invoke lambda
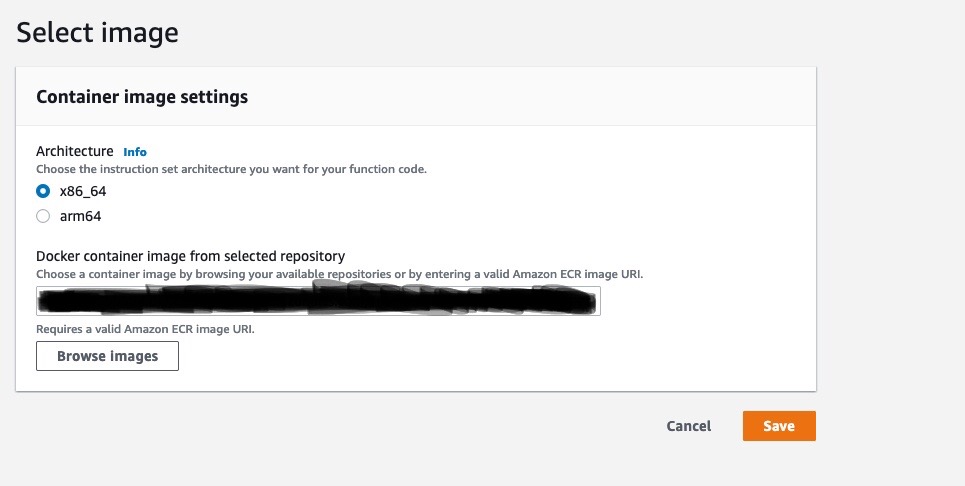
Now, that you have uploaded the image on ECR. Go into that lambda function that you have created.
Click Deploy new image ,

Choose the architecture, x86_64 or arm64 (if the image is built and pushed from mac), and paste the Amazon ECR image URI which you can find in the ECR section where you had uploaded the image, and hit save.
Now, to test the image, go to test, add the JSON as shown below and test.

Here, we see we get the response.

Now, have successfully deployed the python app on AWS lambda.